|
EasyNumerics Software |
|
Finding Roots of Nonlinear Equations
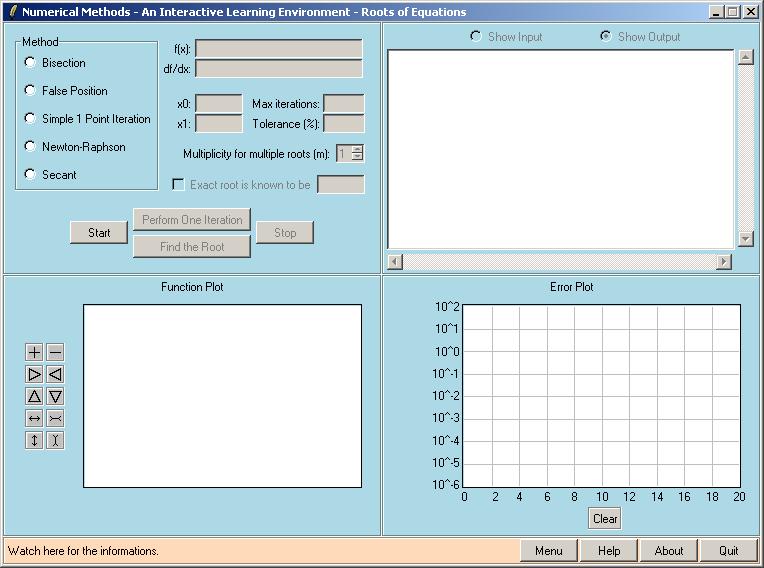
When you select the "Roots of Equations" module from the main menu, the following window appears.
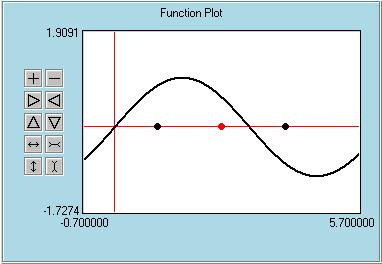
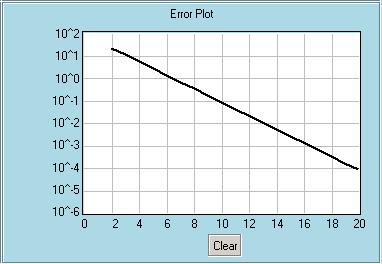
- Bisection Method You use the top left window to select the method and input any necessary data. For example Bisection method requires a function of x, two starting points that will bracket the root, a tolerance to be used as a stopping criteria and the maximum number of iterations to be used to avoid a possible infinite loop in case of divergence. If you know the exact root, you can check the appropriate box and enter the exact root. In this case the program will calculate the true percent relative error after each iteration. If the exact root is not provided, approximate percent relative errors will be calculated. Note that Bisection, False-Position and Secant methods need two starting points (x0 and x1), whereas Simple One-Point Iteration and Newton-Raphon methods need only one value (x0). Bisection and False-Position methods are bracketing methods therefore you need to provide x0 and x1 such that only one root otherwise you will get an error message. For Newton-Raphson you also need to provide the first derivative of the function (df/dx). For Secant and Newton-Raphson methods, you can select a multiplicity value that will speed up the convergence rate in finding multiple roots (more than one root at the same point). After selecting a method and entering all the necessary data, you can press the Start button and some information will appear at the top right (output) window. At this point you can continue by performing one iteration at a time by pressing the "Perform One Iteration" button or you can perform all iterations at once by pressing the "Find the Root" button. For learning purposes select the former way and for a quick answer select the latter. When you click "Perform One Iteration", the function will be plotted in the Function Plot window. The starting point(s) are shown in black and the calculated root in red. There will also be some blue lines that shows you how the root is calculated graphically. For example for the Newton-Raphson method the tangent line at the starting point will be shown. Or for the Simple One-Point Iteration method the Two-Graph technique will be used to show how the roots are calculated. For this technique y=x line is also plotted. After the first iteration you may need to use the small buttons and the mouse to get a better view of the grahp (see the help for Function Plotting for details). The details of the calculations will be shown in the output window as the iteration number, calculated root, function value at this calculated root and relative approximate error (either true or approximate, depending on whether you specified the exact root or not). If you perform one more iteration the results for this iteration will be added to the output window and the Function Plot window will be updated. The previous root(s) will turn to black and the new root and auxiliary lines will be drawn. After the second iteration, lines will start appearing on the Error Plot window, which shows the calculated errors versus the iteration number. Note that the vertical axis is not linear, but logarithmic. When the iterations exceed the maximum value shown on the graph, the plot will scale down automatically. At this point the limits of the vertical axis are fixed at 0.000001 and 100, but this will be more flexible in the coming releases. You can continue the solution like this, one iteration at a time, or you can press the "Find the Root" button any time you want to perform all the iterations. If you do this, you will miss the details of the solution shown on the Function Plot window but the results will be written on the Output window and errors will be plotted on the error Plot window. The iterations will stop either when the error drops below the specified tolerance or when the maximum number of iterations is reached. While performing one iteration at a time, you can stop the solution by pressing the "Stop" button. When the solution is done or the "Stop" button is pressed, you are ready to start another run. Select your method and specify the input parameters and press the "Start" button. The Output window and the Function Plot window will be cleared, but not the Error Plot. The old error plots will be kept there, so that you can compare the convergence characteristics of different runs. You can clear the Error Plot window by pressing the "Clear" button any time you want. To help understanding this root finding process, some snapshots taken during the calculation of the first positive root of sin(x) are shown below. The first snapshot shows the entries. We want to use the Bisection Method. The root (3.141592654) is bracketed between x0=1 and x1=4. Maximum number of iterations is selected to be 50 and the tolerance is set to be 0.0001. Exact root is not specified. Second snapshot shows the Output window after three iterations. First some information about the method used and input values are shown. Than comes the iteration results. Third snapshot shows the Function Plot window after clicking the "Perform One Iteration" button once. The two black points are the starting poins of this iteration. Red point is the newly calculated root (for the Bisection method it is the midpoint of the two black points). Last snapshot shows the Error Plot window. Since the exact root is not specified for this example, the program calculates approximate relative errors are calculated and plotted. Horizontal axis is for the iteration numbers and the logarithmic vertical axis is for the errors.
Please visit the movies section to watch sample runs of EasyNumerics. |


